 Do your plaits look like hairy golf balls? We’ve got some hot tips from champion British equestrian, Jo Bates, on how to tame that mane!
The thought of having to plait is enough to cause sleepless nights if the process seems like some impossible challenge, but a well plaited mane will be admired. If you are aiming for the show ring with a riding horse, hack or hunter then plaiting is mandatory.
Tools for the job The whole task can be made much easier by careful preparation. Make sure that you have everything you need: blunt needle (threaded), wax thread, scissors, mane comb and hair clips can all be put in the pocket of an apron so that they come easily to hand when needed.
You may need to stand on a plastic crate or steps and it is a good idea to make sure that your horse is used to this before you need to plait on the morning of a show.
It is also useful to have someone to hold the horse for the first few times that you plait, so that the horse gets used to the idea and doesn’t start messing about because he thinks that you are about to pull his mane.
Step-by-step
Step 1: Wet the mane and divide it using the mane comb. Each section should be about ¾ of a mane comb width and I use a hair clip to keep the loose hair out of the way.
Step 2: It is ok for the mane to be a bit tacky and I apply plaiting spray to the section which helps to keep all the hairs in the plait.
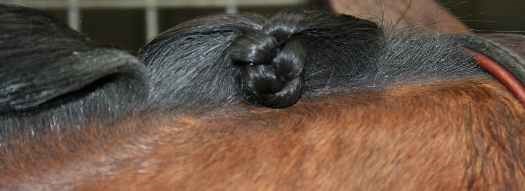
Step 3: Divide the hair to be plaited into three equal sections and start plaiting keeping your thumbs on top. Each plait should be firm, not loose, and this can only be achieved by keeping your thumbs on top.
Step 4: Plait down to the bottom and hold tight with one hand while you pick up your needle and thread. If the horse shakes and you let go at this stage, you will have to start again.
Step 5: Sew round the plait twice near the bottom, and then fold under the loose ends and sew round again to secure the end.
Step 6: Fold the plait in half, turning the end under, putting the needle through from underneath, near the base of the mane, coming out on top.
Step 7: Finally fold the plait in half again, putting the needle through from underneath near the base of the plait and sew up and down through the plait several times to secure it in place.
This is the stage when you can shape the plait by pushing it up or down slightly before sewing up and down through the plait to secure it.
If you need to make it smaller, you can wrap the thread around the plait to pull in the sides. Tie off on top of the plait and use scissors to cut the thread.
Repeat the process all the way down the neck. There are no rules about how many plaits you should have down the neck, provided it looks balanced. I usually get about 12 plaits – I try not to have 13 as it is unlucky! Each plait should be roughly the same size, although the last plait near the wither might be slightly smaller. Don’t forget that the plaits nearer the wither are the ones that are likely to get rubbed by hands so they need to be secure.
Forelock plaits The forelock should also be plaited and can be done the same way or as a French plait. The latter takes practice to make it look good but it can help to tie in all the side bits. If you have a chunkier forelock it is sometimes the only way to get a nice plait that does not look like a football. However I rarely find that it is necessary and it is often easier and less time consuming on the morning of a show to do a regular plait.
Choosing the right type of plait There are no hard and fast rules as every horse is plaited to suit type and conformation, but there are a few guidelines that will help to improve your plaits. Plaiting is an important part of the turnout of your horse for the show ring and can enhance the overall look.
A short neck can be made to look longer by making more plaits, and a weak neck can be enhanced by standing the plaits higher to give the impression of more crest.
Similarly, the mane can be thinned and plaits can be made smaller on a cresty type of horse to make the crest appear smaller.
Finishing touches Plaits can be sprayed with hair spray can be sprayed with hair spray to keep stray hairs in place. I do not trim loose hairs with scissors as, after a few times, you will end up with a spiky mane all the way along, but I might make an exception to this for the really big occasions!
Plaits need to feel firm to touch, not loose, and the secret is to learn to make the initial plait tight, you can only do this by keeping your thumbs on top. It is worth practicing to get this right and it also gives you an opportunity to thin the mane some more if you think the finished plaits are not dainty enough.
Practice at home and getting someone else to give an honest appraisal will help you achieve neat plaits – and the immaculate turnout that is essential to become a winning combination. We thank Jo for her tips!